
Learn About Your Camera to Take Better Photos and Improve Your Photography
Different Parts of a Camera: Liz Masoner is a professional photographer, and she shares her tips and techniques on photo editing and how to photograph nature, portraits, and events with film and digital cameras. Liz has over 30 years of experience, and she is the author of three books on photography.
:max_bytes(150000):strip_icc():format(webp)/GettyImages-141482590-581d080e5f9b581c0b8483a8.jpg)
In today’s world, cameras are so ubiquitous that it’s simple to take them for granted. You might overlook all the moving and non-moving components that go into making a camera work, especially in this digital age. Whether you’re still using film or are having a great time with your new DSLR, it’s crritical to comprehend how this device operates.
You start using a camera as soon as your finger touches the shutter button & you glance through the viewfinder. It’s all intended to use light to take pictures. You will be better able to take excellent pictures once you know how each component of a camera body operate’s.
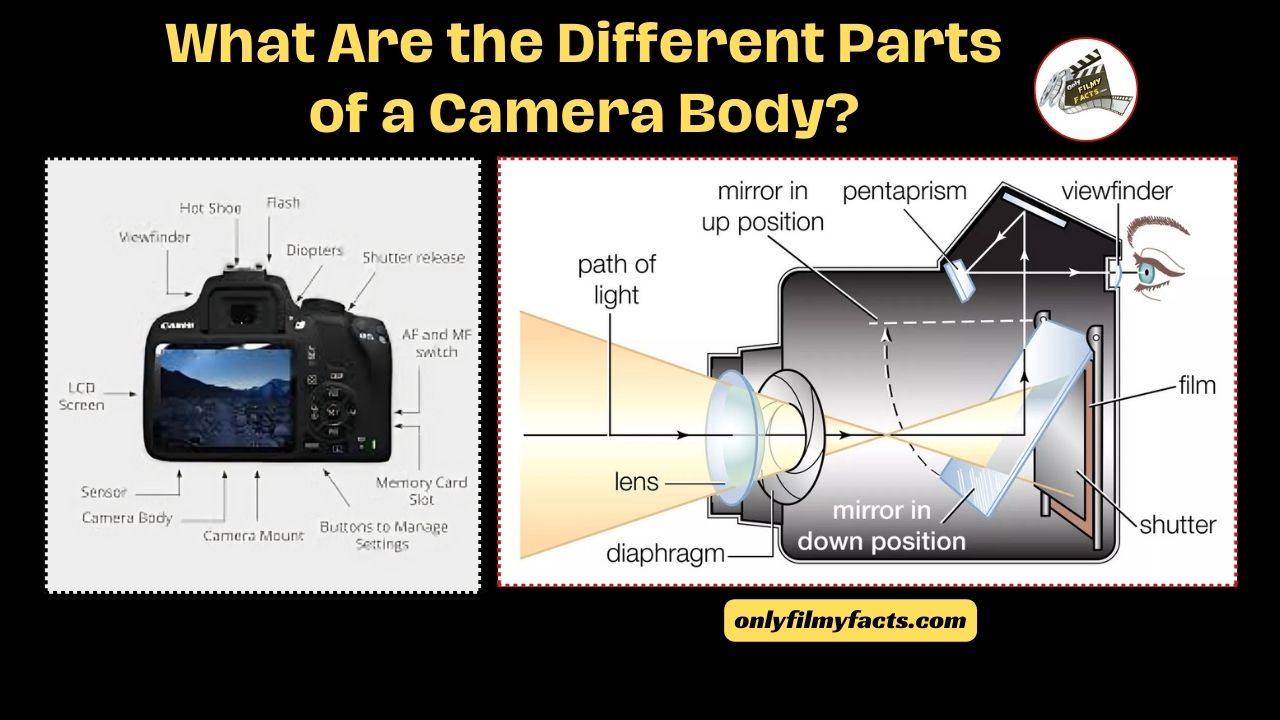
11 Different Parts of a Camera
1. Viewfinder
The aperture in the rear of the camera that a photographer looks through to focus the lens is called the viewfinder. Certain viewfinders allow users to see “through the lence” (TTL) by using a mirror inside the camera. Other viewfinders are just holes punched through the camera body.
TTL viewfinders allow the photographer better accuracy when composing their images. This is so because the lens is seeing exactly what you are seeing. In a digital single-lens reflex (DSLR) camera, it is an optical TTL viewfinder. There may be electronic TTL viewfinders on other cameras.
Rangefinders, on the other hand, are slightly off. The viewfinder hole is not exactly aligned with the film plane’s field of view, but it is parallel to it. Photografhers have to make up for the difference in composition.
You also don’t always need to look through the viewfinder on digital cameras. The camera has an LCD screen on the back where you can compose the shot.
2. Shutter Release
A shutter inside the camera is raised by the shutter release button for a predetermined period of time, exposing the film to light. It is essentially the trigger and the physicall means of instructing the camera to take a picture.
There are several additional uses for the shutter button, depending on the kind of camera:
- In some single-lens reflex (SLR) cameras, this button also raises a mirror that allows the photographer to use the viewfinder to look through the lens itself.
- When using autofocus cameras, such as DSLRs, point and shoots, and certain 35mm film SLRs, the lens is focused by halfway pressing the shutter button.
- The film advances to the next exposure in automatic film cameras when the shutter is released. In manual film cameras, there is a “film advance lever” that must be turned in order to advance the film and the exposure counterr.
Many SLR cameras also allow you to remotely engage the shutter via a cable release or wireless remote.
3. Shutter
The shutter in your camera is an opaque piece of plastic or metal that keeps light from getting to the digital sensor or film. The shutter releace button opens, or releases, the shutter. The shutter speed setting determines how long the shutter remains open.
You will not be able to see the shutter itself in digital cameras. On the other hand, a film camera’s shutter, which is usually a curtain or set of blades, is visible when the rearr is opened.
4. Shutter Speed Control
You can adjust how long the shutter will stay open on the camera using the shutter speed control. Although the shutter speed is expressed in fractions of a second, it is typically only displayed as the denominator. For instance, 60 is displayed for 1/60 of a second.
- Usually, a menu is used to access the shutter speed control on automatic cameras. The screens of the camera—the LCD screen, the viewfinder, and the top of the body—display this exposure information.
- The shutter speed is typically adjusted & shown on a knob located on top of manual cameras.
5. F-Stop Control
The f-stop control is where you will select the appropriate aperture (the size of the shutter’s opening). It is one of the two primary controls over a photographs’ exposure, along with shutter speed.
- The shutter speed is not controlled by the f-stop control, which is located on the camera and is operated by a wheel or dial on automatic cameras. The f-stop reading is next to the shutter speed on the camera’s screens and is generally just a number (e.g., 3.5, 5.6, 8,11, etc.).
- In manual cameras from the past, the f-stop is adjusted on the lens using a ring that is not attached to the focussing ring.
6. Film Speed or ISO Control
You can obtain an accurate exposure reading by callibrating your camera’s meter to the film speed using the film speed control. On automatic cameras, the film speed can be sent electronically via a menu; on manual cameras, it can be sent via a knob.
- A film speed indicator on the top of the camera is frequently integrated with the control on manual cameras.
- The control and film speed indicators on automatic cameras are typicaly located separately, with the film speed being displayed on the camera’s menu’s electronic menu display.
Film speed is known as ISO in digital photography (a term from film that stands for “International Organisation for Standardisation”). The camera’s menus can be used to adjust this depending on the lighting. When shooting in low light, it is convenient to use a higher ISO, but bear in mind that this will result in an image that is more pixellated.
7. Film Compartment
Film is stored in a compartment located in the back of film cameras. The film canister, sprockets for guiding the film across the exposure area, a pressure plate for tightening the film, and a take-up reel for winding the film are all located in this compartment.
In automatic cameras, an electric motor rewinds the film after the roll has been fully exposed. Manual cameras require the photographer to turn a small “rewind knob” to manually rewind the film into the canister. The film will be exposed to enough light to contaminate the pictures if it is not rewound before the back compartment is opened.
8. Digital Sensor
An array of electronics that powers the camera but is concealed from the photographer takes the place of the film compartment in digital cameras. Among these internal parts is a digital sensor, which is a solid-state device that captures the light much as a piece of film does. After that, the data is sent via the camera to create the digital image that is stored on the digital media card and shows up on the LCD screen.
Technology related to sensors is always evolving due to advancements in the field. Nonetheless, it is a digital camera’s brains and will have an impact on each image that camera captures. A sensor cannot be changed if it does not live up to your expectations, unlike film.
9. Flash
Today, a flash is often integrated into cameras. Certain cameras have basic light bulbs integrated into their front. The majority of built-in flashes on SLR cameras emerge from a storage compartment on top for protection.
Frequently, external flashes can be mounted using the “hot shoe mount.” A tiny connector port on the front of older manual cameras allows a cable connected to a remote flash to be inserted.
10. Hot Shoe Mount
The majority of SLR and DSLR cameras have a hot shoe mount, which is a place where an external flash can be attached. Because of its electrical contact points and guide rails that fit over the flash’s bottom like a shoe, it is also known as a “hot shoe”.
The hot shoe mount is usually located directly above the viewfinder. It could be skewed to one side on some older cameras.
11. Lens Ring Mount
A metal ring located on the front of cameras that support interchangeable lenses is where the lens is supposed to be attached. To link the lens controls to the camera body, this ring has electrical contact points. The “lens release button” is a tiny button or lever located to the side of this mount that allows the lens to be released from the body.